Sunday, May 31, 2009
I was tagged...again. :0)
Teresa of Mini Mad Woman blog tagged me. Thank you Teresa! Please see my earlier May post "I was tagged" to see my response. Thank you to all who read my blog and comment.
Saturday, May 30, 2009
A man's suitcase this time
 I've made a new suitcase for my etsy shop. This one is for a man on a business trip. There's a pair of khaki trousers, a white button down collar dress shirt, a neck tie, a belt and a pair of boxers. His ditty bag contains shaving cream, a razor, deodorant, toothbrush, toothpaste and a comb. He's also tossed his wallet in the case while he's packing. I hope he doesn't forget the socks! (I don't know how to make those, :0). )
 The fabric is a navy tweed. The lining is light gray.
Friday, May 29, 2009
New plant

I decided to make a large snake plant (or mother-in-law's tongue) for the living room corner. My husband and I received a single blade start for a wedding gift nearly 27 years ago and it has grown into a monster over the years. It's broken through three pots and has flowered several times. I never knew that they produce flowers when they become root bound. Now I know! :-) Anyway, this is the second one of these I've made and I really like how it turned out.

Thursday, May 28, 2009
My first philodendron
 This is my first attempt at making a philodendron. I used many of the tips I've learned from Jayne at Tallulah Belle Originals but it is far from her standards. I used two sizes of heart punches to make the leaves and they are punched from a coffee filter painted one shade of green on one side and a lighter shade on the other. Each leaf was shaped individually and then glued onto a small stem. The stems were bent so that the leaves bend down like a real philodendron and then each of the little stems were glued onto a longer vine. The darker side of the leaves was edged with some of the lighter paint. All of the branches were planted in some clay with tea soil glued to the top.
Here's how it looks in the kitchen. I decided to put it on the fridge instead of the top of the cabinets because there's more space on the refrigerator and you can see the plant better.
I think I need to make some sort of large floor standing plant for the living room corner by the window.
Come on in!

Please help me welcome Susan of Susan's Mini Talk and Teresa! Teresa's blog is http://minimadwoman.blogspot.com/. She has a lot of beautiful eye candy.
Wednesday, May 27, 2009
A new rug for the kitchen
I found the perfect rug for the kitchen. It has all of the fruits on the border and the pineapple to match Katie's dishes. I printed the rug onto T-shirt transfer paper and ironed it onto Aida cloth. You get the effect of handstitching with the texture of the cloth. I think it would be better with 18 or 24 count cloth but all I had was 14.

Tuesday, May 26, 2009
The kitchen is finished...well mostly
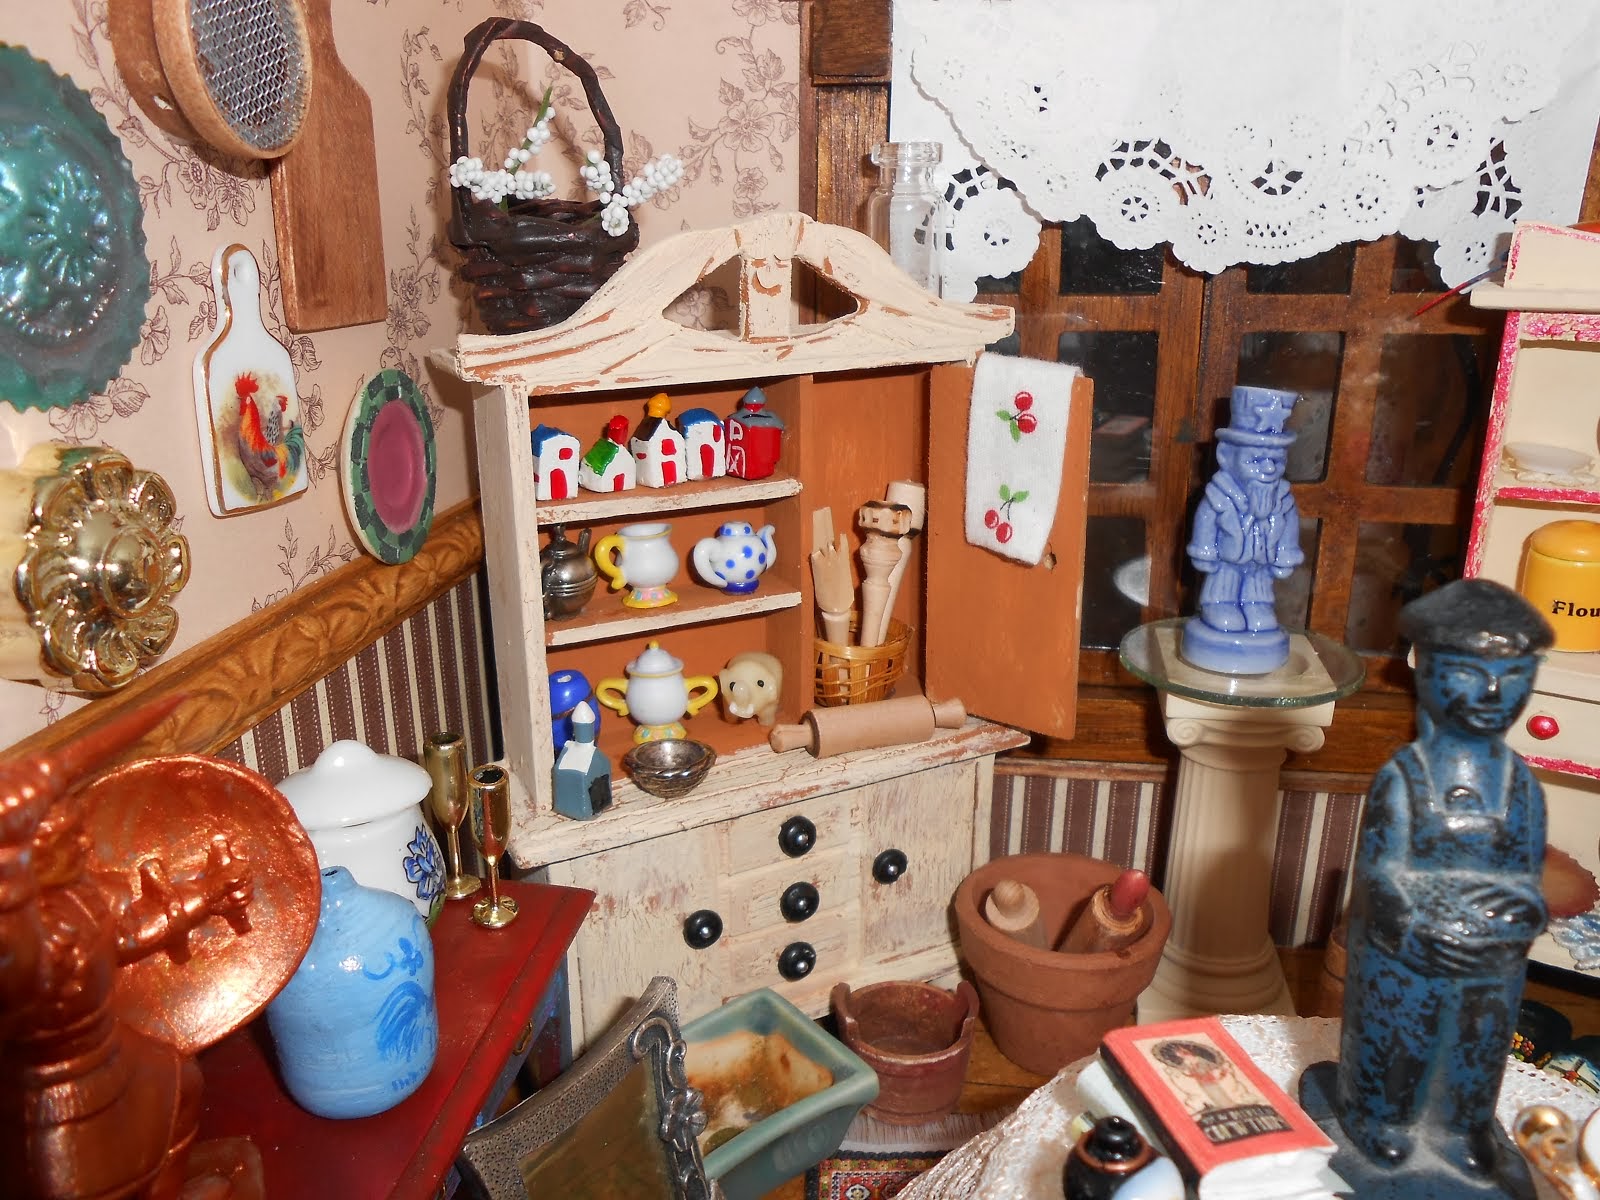
 Here's the mostly finished kitchen. I still need to add accessories and food. I think I'd like an ivy plant on top of the top cabinets.

The handles on the refrigerator are the clips from a couple of Sharpie markers. I carved the handles for the stove. I also added bead knobs. The color of the appliances is more cream than white but it's hard to tell in the photo. I just didn't want bright white. The trash can to the right of the stove was made by my friend, Brenda. It is amazingly detailed. There's a banana peel, an apple core, fish bones, and some snack food packages. Brenda also made the bananas on the hanger, the apple cookie jar and the clock. Judy made the spice rack and the salt and pepper shakers on the table. Sandy (Copeland) made the large pepper mill on the stove. The cookbooks were made by Grace (Treefeathers). Gaye (My Small Obsession) made the enamel ware in the cupboard and on the table. The tablecloth and napkins were made by Joan. There's a matching apron that I will probably put on the doll I make for this house. The pineapple dishes were all made by Katie. I won them in one of her contests.
It's all coming together really well. The kitchen swap items add so much to this room and everything was in the right colors and so many items were fruit themed.
Sunday, May 24, 2009
A new wine rack
I was never really happy with the looks of my first attempt at a wine rack. I looked at my real sized one a bit more closely and this is the result. It's made with four beads and two U-shaped pieces of wire. I painted the finished assembly antique copper and then brushed a leaf green glaze over that.

Range hood
I can't get motivated to make the stove and refrigerator but I did make a range hood. I used the plastic hood that came with the kit, some styrofoam, and spackle tinted with paint. I cut up some of the border into tiles. I've also used border tiles as a back splash for the sink and I plan to do the same behind the range.


Saturday, May 23, 2009
Surgery went well
My father in law came through surgery with no complications. They gave him several units of blood before the surgery and he's much stronger than he's been in quite some time. The abdominal bleeding has not been stopped yet but the plan is to figure that one out early in the week. He's one tough old dude. :0)
Thank you all for your good wishes, prayers and expressions of concern. I am so thankful for all of you.
Thank you all for your good wishes, prayers and expressions of concern. I am so thankful for all of you.
Friday, May 22, 2009
We've had some bad news
Don't worry if I don't post much for the next several days. My father in law fell last night and broke his hip. He is 88 and very fragile and the doctors aren't sure if he'll make it through the necessary surgery. He has overcome many things in the past several years that a lesser man would not have survived, including running over himself with a tractor. He's been as much a father as my own was and it is very difficult to see him so weak and frail.
Thursday, May 21, 2009
An award after another long day of moving
 Thank you, Belle, for the Butterfly "Coolest Blog Award." Belle said in her post that she didn't know how I was able to get so much done. I get a lot of mini work done when I'm under stress and this has been a VERY stressful month. The advantage is that my dollhouse is looking great!
I'm awarding this to all of my blogging friends. I so enjoy reading and following your blogs and I've learned so much. Thank you all!
My husband is doing better. He's going to work tomorrow and he helped with moving our daughter home from college today. I really think he should stay home tomorrow but I don't think that will happen. Yesterday my brother helped me move our oldest daughter back home. The house still looks somewhat like a war zone but it's improving.
I hope to have some time for minis tomorrow. I need it to save what's left of my sanity. It has been a very long week. Maybe I'll have some pictures tomorrow.
Tuesday, May 19, 2009
I made a couple of minis after all!
This wine rack is an experiment. I'm not sure if it is gonna be the final one but it isn't a bad first try. :-) The bathroom is now finished, I think. Today I added the soap dish by the sink, the hamper under the window and the red shelf to the right of the window. The hamper is just a film canister that's been cut down a bit shorter and then wrapped with jewelry cording to look like wicker. The shelf is the shelf that comes with the Real Life Miniatures kitchen kit. I had to make it narrower to fit the space but it works well for holding all of those bathroom essentials. I still have room to add more later, too.

 The bathroom is now finished, I think. Today I added the soap dish by the sink, the hamper under the window and the red shelf to the right of the window. The hamper is just a film canister that's been cut down a bit shorter and then wrapped with jewelry cording to look like wicker. The shelf is the shelf that comes with the Real Life Miniatures kitchen kit. I had to make it narrower to fit the space but it works well for holding all of those bathroom essentials. I still have room to add more later, too.
Three new followers!

Please help me welcome George(www.tallminiguy.blogspot.com), Ara (www.afminimansion.blogspot.com) and Kim (www.flowerkim.blogspot.com). Stop by their blogs and say hi!
Long day...
I had some medical tests this morning and then I had to take my hubby back to see the doctor. My husband gets to spend the night in the hospital having fluids pumped back in and possibly some tests run. We also have to move both daughters home for the summer, one tomorrow and the other on Thursday. I may not be around much but will post again when life calms down again.
Monday, May 18, 2009
It worked!

I was able to make my modifications to the upper cabinets work. The small cabinet over the sink was supposed to go over the stove at the far end of the cabinets - my stove won't fit there and I like this layout since I don't have a window over the sink. I also left off all of the doors and added glass shelves to the inside of the larger cabinets. That gives me more display room and also gives the cupboards a more contemporary look.
I got the stair surround finished, too. The glue hasn't dried in the photo but you get the general idea. :0)
The final photo is of the living room art. My hubby just celebrated 20 years with his employer and he got a couple of catalogs from which to choose his recognition gift (he chose new golf clubs, btw). One of the catalogs was of artwork, copies of several modern artists in perfectly scaled little prints. I framed a few, painted some brush strokes on with Mod Podge and they look like the owner/artist framed some of her own works for the wall. Oh, and the frames are Dollar Tree plastic stickers that come in three metallic shades. I rubbed some black paint over them to tone the metal color down a bit.


A busy morning...and no minis yet!
I had forgotten how much you can accomplish when you start your day early. I've been staying up way too late and then sleeping in but today the dog was howling outside at 6:30 am and I decided to just stay up. So far, I've done a load of laundry, sanitized the downstairs bathroom, dropped some things off at the high school, mailed a package at the post office, filled in some holes in the yard that the dog dug and painted my finger and toe nails. Now I'm eating lunch. I'll be able to spend guilt free time on the dollhouse this afternoon, lol. I'd have worked on it anyway but at least this way I feel more productive.
I have some ideas for altering the upper cabinets. I'll post photos later if it works. Off to the work room soon!
I have some ideas for altering the upper cabinets. I'll post photos later if it works. Off to the work room soon!
Base cabinet is finished!

The kitchen is starting to look like a kitchen now. The base cabinet is finished and I couldn't resist accessorizing for the photo. There are a lot of gifts from some very talented friends on display.
I made the "stone" countertop with scrapbook paper and Mod Podge (what did the world do before Mod Podge?). I used a silver paint pen to make my sink "stainless steel" and I had to repaint the faucet, too. It had discolored over the years. Parts of this kitchen kit are going to be very challenging because pieces have fallen out of their numbered wood sheets and are lying loose in the box. Took me forever just to find one cabinet door today. There's also some warping which adds to the challenge but what is life without challenges?!
Sunday, May 17, 2009
Mini curtains

Now that the outside of the house is pretty much finished, I can spend some more time on the really fun stuff - the decorating. As I work on this house I am getting an idea for who the owner is. I think she's a single lady, in her late twenties, who loves frilly feminine things but is not afraid to work for them. She's done most of the remodelling work on her house and has restored many of the furniture pieces.

The bathroom now has a lace trimmed Roman shade, towel bars, and toilet paper holder. There are still plenty more things that can go in here but it's a start.  The bedroom has pretty billowy white
  curtains with a ruffled valance and the nightstand has an embroidered doily.
 The bedroom has pretty billowy white
  curtains with a ruffled valance and the nightstand has an embroidered doily.
 I really like the kitchen curtains. (Thanks for another great tutorial, Casey.) They match the upholstered chairs. The curtains are not crooked, btw. Unfortunately, the border slopes upward a bit on the left. I made a few adjustments to the pleats after I took the picture and it doesn't look quite so obvious now.
Saturday, May 16, 2009
The exterior is complete...I think
 I really hate doing shingles. So I borrowed an idea from Casey and made a pattern in the shingles. That kept if from being too boring. I did not, however, cut my shingles into quarters! Tessie's Cottage looks amazing but I am not that dedicated! I used another of Casey's tips and dry brushed a lighter shade of the shingle color on the edges of the shingles.The photos don't really show it all that well but it looks really nice in real life. Thank you, Casey, for all of the tips you post on your blog.
Oh, the "I think" above is referring to the fact that I don't know if I will leave the foundation looking like concrete or if I'm going to decide it has to be bricked like the steps. For now, it will stay concrete. I really want to get started on the kitchen cabinets.
 The kitchen now has a table and chairs and a few accessories. It looked too empty when the other rooms are already furnished. I used the punch out kits that came with the house but I cut off the little Mickey Mouse ear looking things on the top of the chair backs and then completely upholstered the chairs. The table is covered with a beautiful handmade tablecloth I received in a Small World swap. I can't post closer pictures yet because one member still hasn't received her package. Soon I'll post pics of all of the amazing things I got for my mini kitchen.
Welcome!

Please help me welcome Dale of dalesdreams.blogspot.com. Dale also has an etsy shop, also called Dales Dreams. Dale makes beautiful mini seat cushions, bedding, curtains, etc. Thanks for stopping by!
Friday, May 15, 2009
The finished steps and front door
 Here are the finished steps. I used thinned gray paint and dripped it into the grout lines. Then I brushed pastel colors into each individual brick. I finished the whole thing with a coat of matte Mod Podge to seal it.
This is the door with paper behind it so that you can see the glass pattern. The door knob is a mini paper fastener flattened out.
So here's what I did with the steps
 This is a spackle/glue/paint mixture. Once it is dry I will highlight the grout lines and dry brush color onto the bricks.
 I decided to name my little house, or at least give it an address. Magnolia Way is for the magnolias in the bathroom and 509 is for May 2009 when I received the gift.
 I decided not to use any of the lacey gingerbread. It just doesn't seem to suit this house. Instead I used the flat trim in the peaks and I did use the little peak trim pieces. I just didn't punch the hearts out. I also added more of the flat trim in patterns around the house. I really like how it turned out. I just have shingles and painting the steps to do then the exterior is finished!
 I put a piece of paper inside the window so you can see the "stained glass" detail. The other upstairs windows have half of this design in a half circle pattern.
Thursday, May 14, 2009
I need a couple of opinions
 The exterior is nearly finished but I need some opionions. First, should I use the shutters and, if so, what color should they be? I'm leaning towards leaving them off and just using the window boxes. Also, what color should the porch steps be? I've considered concrete (gray with sand mixed in), brick or just stained like the trim (but that seems like too much of a good thing, lol). The shingles will be stained the same color as the trim, I think. There is also some gingerbread trim with the kit. I'm not using the ridge trim but I will probably use the dormer edging.
 I need to make some sort of surround so that the mini people don't fall down the stairs on their way to the bathroom at night. I'm also debating whether to do curtains (from the stained glass line down) or roman shades in here. The "carpet" is made from a wallpaper scrap.
 All that's left to do in here are the little finishing details - toilet paper holder, towel rack, trash can, etc. And I need to make some sort of shade for the big window in here, too.
 The glue isn't dry on the stair rail yet but I love how this turned out. One of those ugly open-backed stair kits came with the house. I did use that but I turned it upside down and used those steps as risers and made my own treads. The spindles are fancy toothpicks painted gold and pinched together at the top. I put a cardboard back on the staircase and covered it with the striped wallpaper. It looks so much nicer than the way it was meant to look.
There was enough of the exterior trim left over to use as baseboard, too, with some to spare. I haven't put any in the kitchen yet - not until I get the cabinets assembled and installed.
Windows in and exterior started
 I made my own stained glass windows instead of the toy looking ones that came with the kit. The upstairs arches coordinate with the rectangular bathroom window and the downstairs arches coordinate with the door window. I downloaded pictures from a catalog website and sized them in Adobe Photoshop before printing them on overhead transparencies.
The exterior is painted a creamy yellow with sand mixed into the paint to give it a nice texture. I'm obviously not yet finished with the exterior beams but I'm making progress. I just need one more on the lower part of each end and then I'll finish the front steps before putting the front trim on. I'm hoping to have enough of the wood left over to use for baseboards, at least on the lower level.
One of today's projects has got to be to finish the bedroom floor. I think I'll look through my wallpaper samples again. Maybe I can make a carpet sized tissue rug...
Wednesday, May 13, 2009
I've been tagged
I was tagged by Deborah at http://www.dlsarmywife.blogspot.com/. I was also tagged by Tessie (she got to the computer last night, lol) at www.caseymini.blogspot.com.
So this is how tag works:
1. Name and link back to the person who tagged you.
See above. Be sure to visit Deborah's blog. She has some really interesting and fun clay creations. Plus she spotlights various artists.
2.List 6 unimportant things that make you happy. That's harder - if it makes me happy is it really unimportant? Chocolate, my morning cup of tea, the smell of lilacs, sunshine, the color green, walking through autumn leaves and hearing them crunch
3. Tag 6 bloggers and let them know by leaving a comment on their blogs. Off to go tag some friends. Note: If I tag you and you don't want to participate, I won't be upset. I understand that we all have busy lives and you might not have time for this. :-)
I was up way too late (early?) working on this...
 I think the bed turned out really well. I used the punch out kit that came with the house and dressed it up with some embossed stickers. I made the bedding from some scraps in my fabric drawer. Under the bedspread is full set of sheets.
 I decided to add the glazes to the kitchen walls - I like it. Once the cabinets are in place, much of the walls will be hidden and there will be just the right amount showing. I think it looks more like plaster walls now with a sort of "Old World" feel. Fits with the French style furniture in the living room.
 Tuesday, May 12, 2009
Got some more done today
My friends from Small World tease me about how quickly I work when I start a new project. I get a bit single minded once I start something and can't wait to get it all finished. I made a lot of progress on the Brookfield today. I'm not bashing the kit at all so it's going very quickly. I really need to decide what I am doing with the exterior. I have some ideas but I'm just not sure yet.
 I love the living room! I need to build the staircase and trim the windows, etc. but it's coming along very nicely.
 I think there's enough room in the kitchen for the cabinets along the left wall, the appliances on the right wall and the dining table in front of the windows. I haven't decided if I'm leaving the walls as they are right now or if I want to stipple some darker and lighter shades of olive over the top of the paper.
 I think the bedroom is very elegant. I'm going to use the dresser from Brenda and pretend the owner of the house set up her still life there for painting. I plan to use the bed kit that came with the house. I'll stain it to match Brenda's dresser and dress it up somehow. I'm still thinking about what to do with this floor, too. The wood has a fairly deep gouge that goes the whole length of it so I don't want to just paint or stain it.
 There's not quite enough room on either side of the mirror for both sconces so I'm going to use one over the mirror and the other over the tub. I'll put the crystal chandelier in the bedroom. I really like the way the bath and bedrooms coordinate. The marble floor in here is a wallpaper sample.
 I really need to decide what I am doing with the exterior. I have some ideas but I'm just not sure yet.
 I love the living room! I need to build the staircase and trim the windows, etc. but it's coming along very nicely.
 I think there's enough room in the kitchen for the cabinets along the left wall, the appliances on the right wall and the dining table in front of the windows. I haven't decided if I'm leaving the walls as they are right now or if I want to stipple some darker and lighter shades of olive over the top of the paper.
 I think the bedroom is very elegant. I'm going to use the dresser from Brenda and pretend the owner of the house set up her still life there for painting. I plan to use the bed kit that came with the house. I'll stain it to match Brenda's dresser and dress it up somehow. I'm still thinking about what to do with this floor, too. The wood has a fairly deep gouge that goes the whole length of it so I don't want to just paint or stain it.
 There's not quite enough room on either side of the mirror for both sconces so I'm going to use one over the mirror and the other over the tub. I'll put the crystal chandelier in the bedroom. I really like the way the bath and bedrooms coordinate. The marble floor in here is a wallpaper sample.
More progress on the house
 Wallpaper and floors are finished in the kitchen and living room. I do still need to varnish the kitchen floor. The back edge trim is also in place in this photo.
 Living room border in place. I went with the pointing up option. The discoloration in the middle of the wall is not there in real life.
 Light olive kitchen walls with the fruit border.
 A dry fit of the roof.
Subscribe to:
Posts (Atom)