Thursday, July 31, 2014

And so it begins

Yesterday I picked and canned our first green beans of the season. Lucille asked to see a photo of the results. We got a late start on our garden so we're a little behind everyone else but from now until October, if the weather holds, I will be canning or freezing something. I'm afraid we won't get any corn this year but we should have good harvests of green beans, tomatoes, peppers, potatoes, cabbage, and various varieties of squash. I will probably only have beets enough for one canner full this year but they will be a great treat this winter. The peas and carrots will provide a few fresh meals but there won't be enough to process. Every year is a surprise as to what will do well and what won't. But we will have plenty of food to put up for the winter and I will enjoy knowing just what my family is eating.

Have a wonderful, blessing filled day!

Wednesday, July 30, 2014

I'm just floored!

 Well, not really. But I did finish the living room floor. :-) I decided I wanted it to be lived in and embraced the spots that didn't take the paint and stain. I added rocking chair marks - much like the ones on my floor.
 It is hard to see in the whole area photos but the floor has 12 inch wide planks.
I put the trim in where I could and waxed and buffed the floor to give it a soft sheen. I can't do much else in here until I get the stairs in. I don't think the console table will fit under the stairs and I haven't decided what sort of table I want between the chairs. And what about a coffee table? So many decisions left to make. I have to get busy on the rest of the structural details like doors and the hall soon. The bedroom is at a standstill until I get that door in. (I could make the bed, though.) The upper story hall is still completely naked, LOL. And I have to get a door in there, too. No more today, though. I picked and canned two canners full of green beans. I'm ready for some down time.

Tuesday, July 29, 2014

A day for details

 The bathroom is closer to finished. At least it has most of the essentials. I added toilet paper - a standing dispenser and a spare roll on the tank. The tub faucet is finally in place, too. Rugs, mirror, candle, and a new lid for the bath salts finishes today's work in this room.
 A piece of country styled art for the living room and a rug that will lay flat once there's a finished floor in here.
 The kitchen got a huge ivy plant that hides the upper cabinet join and a pitcher of flowers for the top of the fridge. There's also a new rug for in front of the sink....
 ....and a kitchen clock showing that it is, indeed, lunch time.
I've done nothing to the upper hall or any of the doors. I'm probably going to finish most of the interior work before even starting the exterior. I'm working on this project in very topsy turvy manner but I am having fun. :-)

Zibbet has a fresh new look!

Stop in and check it out. To celebrate, all one inch scale dolls and all vintage dollhouse furniture are 10% off at De-Lightful Minis by MiniDe.

Monday, July 28, 2014

But what about the floor?

 Well, I don't yet know the answer to that question but I did have time to work on the furniture for the living room. I made the slipper chair from a small hinged jewelry box, wood pieces, batting, fabric and trim. The toile loveseat was made completely from scratch. I am really pleased with it.
 A closer view of the loveseat and it's gingham rooster pillow. I made the upholstered valance and the curtains (made from a coffee filter.)
 A closer look at the chair with its roll pillow - rolled fun foam with fabrics and trim glued on.
This is a potential living room layout. I'm not sure if the console table will fit under the stairs and I need some side tables and art and ...oh, right, there's still that floor. I think it needs a dark wood floor for balance. I'm still thinking about this one. Ideas, anyone?

Sunday, July 27, 2014

And the "ayes" have it!

 But first, a minor bathroom update - just a jar of bath oil beads and a bar of soap. The jar took no creativity. It's a bottle of nail art beads just as it came out of the package. The soap was cut from a real bar of soap and rests in a seashell soap dish.
 I added my "aye" to the few other opinions expressed and there's now a small island in the kitchen. Most of the ones that I liked on Pinterest were sort of dressed up work tables. I was drawn to the wood tops and rustic black finishes so that's what I made.
A salad with all the trimmings is being prepared. The salad bowl is an acorn top. The dressing bottle was made from an electrical connector of some sort. They come in red and are shaped like a bottle. I hand carved the knife and made some of the polymer clay veggies and the bacon.
 I haven't purchased many things for this project but when I saw these mugs with the red roosters, I just had to have them. :-)
The cheesecake on the island shelf and the round loaf of bread on the counter were both made by Gaye, of My Small Obsession.

Friday, July 25, 2014

I am loving this house!

 The kitchen still needs some finishing details but it's mostly finished. I want to add a yellow gingham cushion to the window seat, some rugs, and plants and collectibles on top of the cabinets. I need an opinion please - I'm thinking there's plenty of room for an island since everything is fairly small in scale. What do you think?
 A trio of rooster plates to the left and a tray over the bay. The valances are cut from scrapbook paper.
 The rooster pepper grinder on the stove and the matching cutting board hanging over the sink are Reutter Porcelain pieces. I'd forgotten that I had them but they were in Then Again Antiques. Who knew that it's as much fun to shop in a mini antique shop as in the 1:1 ones. :-D
The bathroom needs a rug or two, curtains or shades, and a mirror over the sink. I need light fixtures for the whole house and the tub still needs plumbing. Adding the windows and the trim around the tile added so much to the look.

The granddaughters will be here tonight for the weekend so there won't be any mini progress this weekend. Next week is my last before I go back to work after summer break. I don't think I will finish but I should make some big progress. Stay tuned!

Thursday, July 24, 2014

Sometimes a dollhouse has other plans

...than the ones you have. This time it was the bathroom. It doesn't look anything like the original idea I had. I like this so much better. The first project was to get that wall between the hall and bathroom in. Then I could get to the fun part. I really didn't know what I would use the toile scrapbook paper for when I purchased it. I think it looks great in the bathroom. The blue towels help to carry some color over from the master bedroom. I ended up painting the outside of the tub because it reflected all the patterns in the room. I really like the black. The tub still needs plumbing and I need to finish the windows, trim out the rest of the wall tiles, and glue the stone privacy wall in place.
 The kitchen wallpaper and flooring are done. Once the bay window is finished I can put up the chair rail on the window and hutch walls. I finished the upper cabinets, complete with the range hood. That's another project I'm happy with. I had thought of doing a hammered copper hood but the sheet metal was not cooperating. The small cabinet over the sink and the range hood are both made from the top of a hutch that looks just like the plate shelf. I cut away the bottom shelf on the sink side and closed in the top to make a cabinet with doors. I left the back on the range side to help form the frame work for the hood.
The walllpaper is finished in the master bedroom, too. I just have to figure out what I want to do with the floor here and in the living room. I'm glad this is a fairly busy print because I had to do a lot of patching to have enough paper to cover the tall back wall.

Today was productive in the dollhouse and I got some needed chores done in my 1:1 house. Life is good!


Wednesday, July 23, 2014

Bathroom fixtures and...

...a better photo of the table and chairs.This was through the kitchen window.

 I converted a Victorian style washstand into the bathroom sink and painted the inside of the tub to look like porcelain. I cobbed together a bunch of miscellaneous pieces to make a rather ugly toilet but it looks just fine when you can just see the top of it over the little privacy wall. The sink has a drain pipe but we're pretending the water lines are in the wall. I plan to put towels and extra toilet paper on that bottom shelf.
I need to cut a wall to separate the bathroom from the stairwell. I think the mini people deserve a bit of privacy while using the facilities. ;-)

Tuesday, July 22, 2014

It's all in the details

 I am on my phone so it isn't a great photo but this is the finished set complete with accessories.

I searched through my mini stash and found some goodies for the little girl's room. The 3/4 scale bed makes a great toddler bed. Mini friends made the rocking horse, doll, and wagon with blocks. I made the basket of baby necessities on the dresser. Sometime soon I will actually work on the structure instead of just the fun stuff, lol.

Way too much coffee!

All that coffee meant very little sleep. So, wide awake with an idea in mind led to "wrought iron" chairs to go with the wine glass table.

This is how they looked when I finally went to bed at 3 a.m. An updated photo with all the painting finished and lunch on the table will be coming soon. :-)

Monday, July 21, 2014

When life gives you...

...broken stemware, make a mini table. After a long and frustrating morning, I opened a cabinet to put something away and this heavy plastic wine glass fell out. Grrr. But then I saw how cleanly the base broke off and wondered how I could use it. (Because that's how we miniaturist people think, right?) I had purchased a package of trophy cups at Dollar Tree to use for urns in the new dollhouse and realized, after measuring, that it would work as a base for the "glass" topped table. I painted it to look like iron, glued the top on, and I have a lovely little table. Next up will be attempting to make "iron" chairs to go with it.

Sunday, July 20, 2014

Roosters everywhere!

 I spent some time this afternoon searching google images to find rooster plate patterns for the open shelf cabinet in the mini kitchen. Last night I ordered four mini rooster mugs to place in front of the plates and then this cupboard is filled. The wide variety of patterns available has inspired me to start collecting rooster/chicken plates for my real kitchen. We've been using my current dinnerware for many years so it's time for a change. Once I've collected enough dishes, I'll pack my current ones away until I'm ready for a change again. This is gonna be fun!
I made some extra plates, platters and bowls to use on the walls and at the dining table. My mini people are going to mix their patterns, too, I think.

Have a great week!

Saturday, July 19, 2014

Changes in the wind

If you've been following me for any length of time, you know that I can rarely call something finished and then leave it that way. ;-) Fortunately, my changes are usually improvements and, in this case, that is definitely true. I just didn't like the look of two separate cabinet units when that isn't how they look in real life. So I trimmed a bit here and filled a bit there and painted over it all. Then I used a scrap book trim, filled in the holes with different colors, added a bit of Triple Thick, and called it tile. I added bits and bobs from my stash to blend in any problem areas, and...ta da! Now I should probably finish the walls, flooring, windows, etc. LOL

Hope you are all having a lovely and blessing filled weekend!

Am I the only one

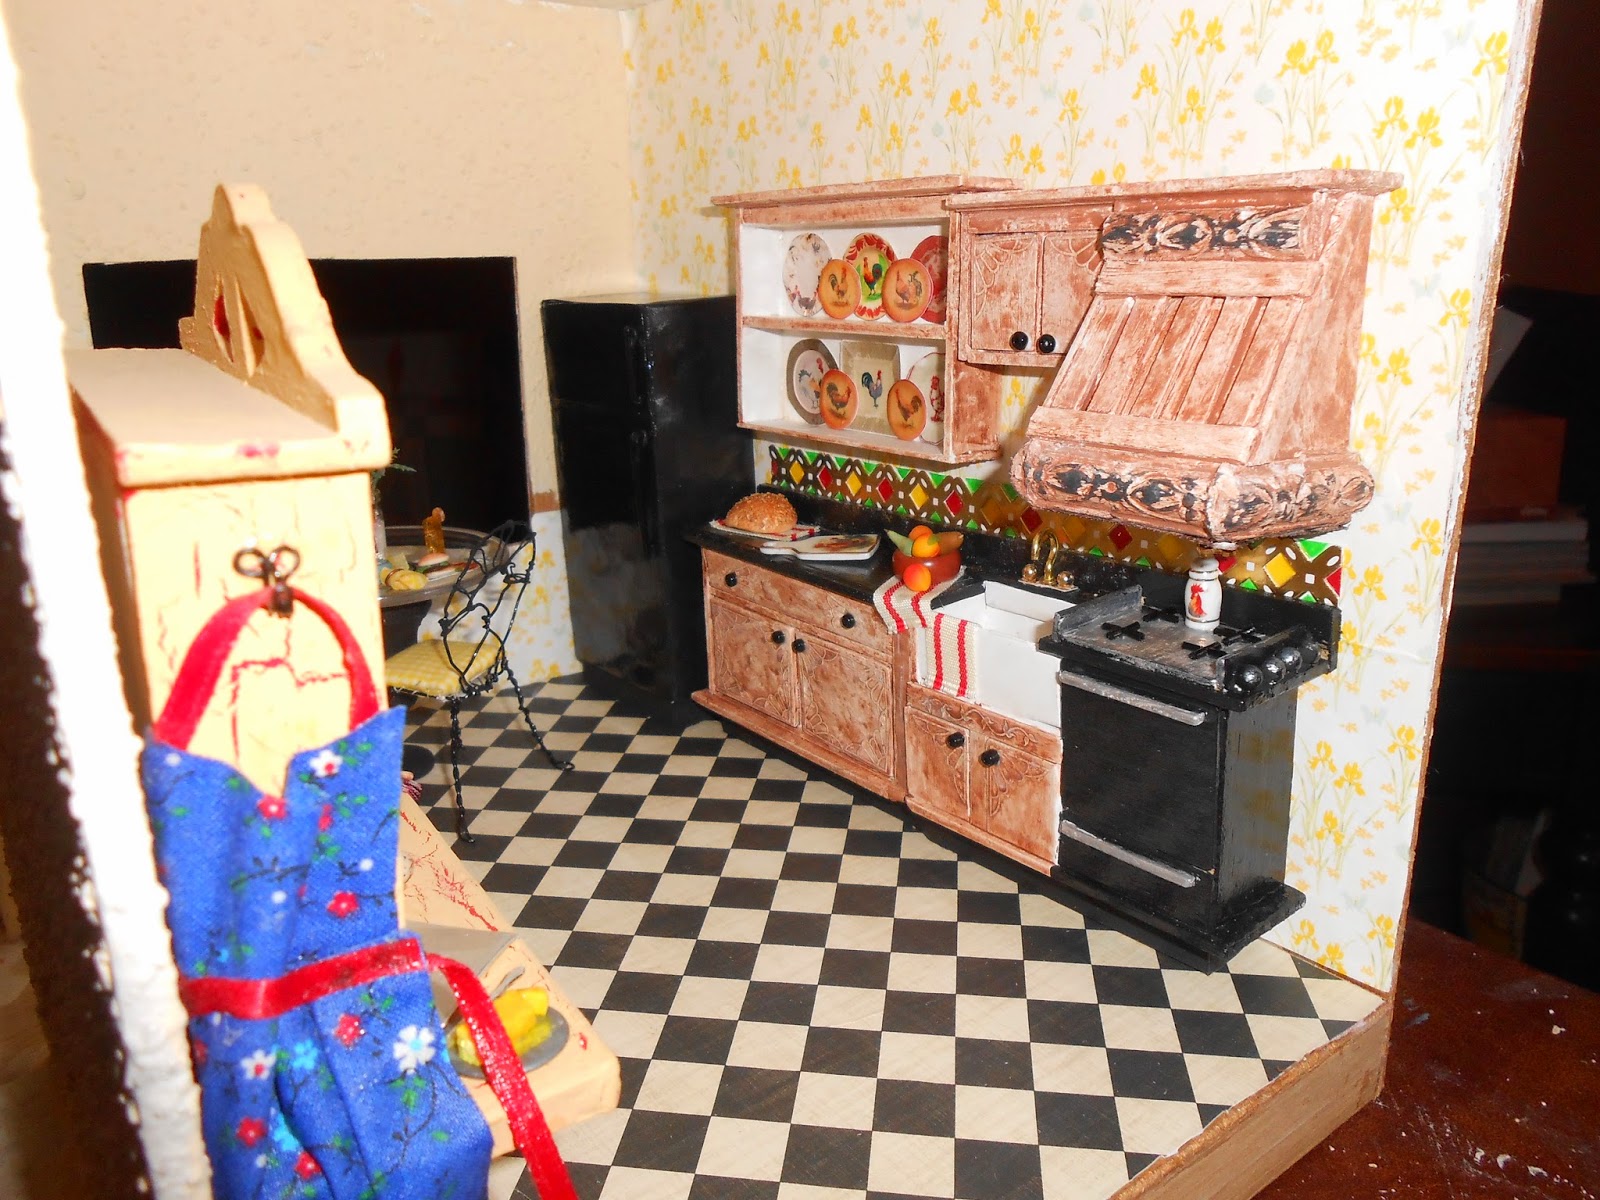
...who makes the interior furnishings before finishing the building? I'm not sure why I work this way but I do. It's partially because I like making the furniture best and once that's done I'm more motivated to finish the house. I'm going to try to go back and forth on this house. I did get some of the painting done yesterday and I really like how the living room plaster turned out. Anyway, here are the finished kitchen pieces:
 I'm really pleased with how the kitchen cabinets and appliances turned out. Parts of two Michael's hutches, a block of balsa, cardboard, cardstock, beads, woodsies, and stickers got the project this far. Still needed: faucet, backsplash, and a second shelf for over the sink/range area.
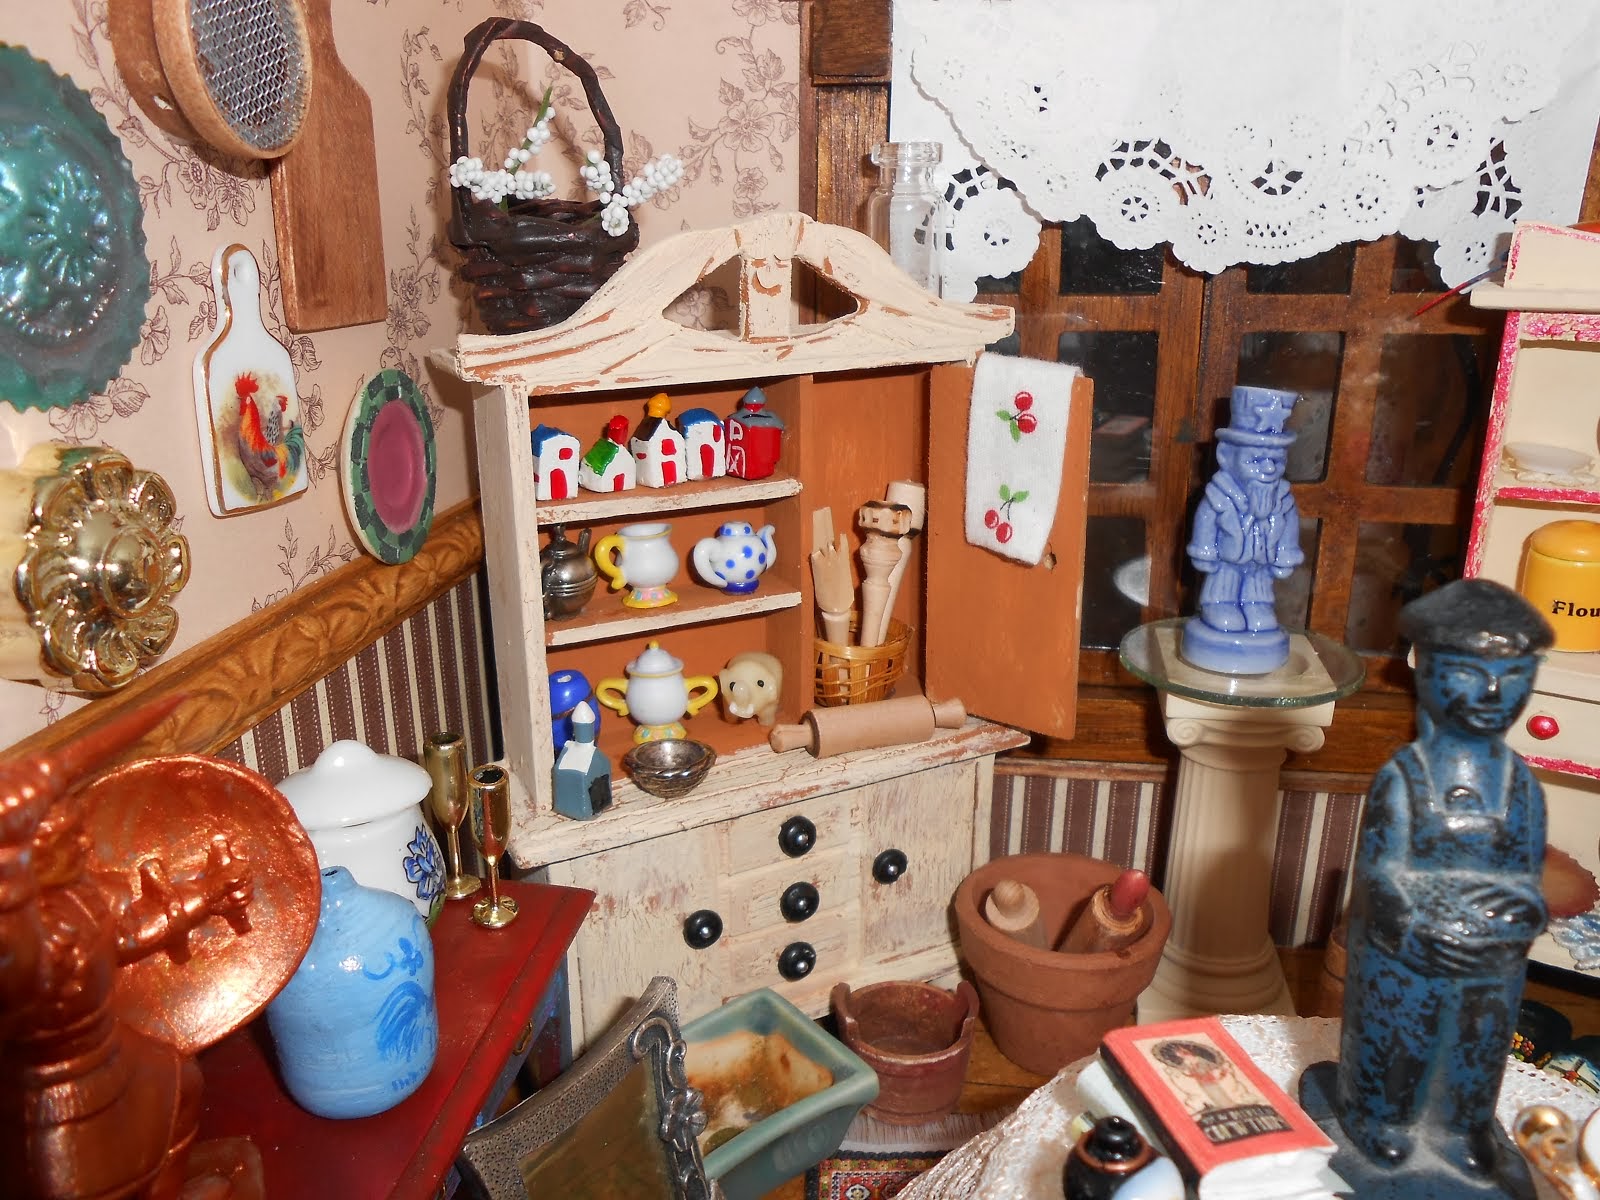
 This is the baking hutch that I pulled from my zibbet shop. The yellow over red finish makes it perfect for this kitchen. I don't remember where the dog came from but he will be one of the residents here.
 I am just playing with layout possibilities here. I hope to make an "iron" headboard. I have fabrics chosen for the bed linens. I don't know if I will leave the rocking chair as is or distress it. Opinions?
 The bathroom is really rough at this point. The shelf unit will be finished and wall mounted for towels and other supplies. The tub will be painted and probably have wall mounted plumbing fixtures. I am tentatively planning to somehow use the wash stand as a sink but I think it is oversized so I'd have to cut it down. At this point, the toilet will be completely from scratch unless I stumble on one at a thrift store.
The nursery will keep this walllpaper. I have pink carpet for the floor. The baby needs some work. She's not very pretty, lol. I think lightening her hair will help. She was only $1 at the miniature shop in Holland, Michigan, we visited last month. I figured I could fix her up somehow.

Friday, July 18, 2014

I forgot how much fun it is!

 No change in the house tonight but I made big progress on furniture. The nightstand and armoire for the master bedroom - the wallpaper for that room is behind them. These took forever due to the multiple coats of paint I needed to get the effect I wanted.
 This wallpaper and border were already in the room. I really like them so I'm going to make this a baby girl's room. Her dresser turned out well, I think.
 The kitchen cupboards and appliances before painting - at this point they have a coat of gesso.
 The shelves on the counter next to the fridge will be mounted on the wall. The refrigerator is a paper covered block of balsa. The rest was made by bashing Michael's hutches.
 This is after the paint treatment for the cupboards. I still need to finish the appliances and countertops. The cabinets need knobs, too.

Farmhouse sink and range in the same unit. There's never quite enough space in a dollhouse kitchen but this works pretty well. I still need faucet, burners, and a finish of some sort on the stove. The kitchen is going to be primarily yellow with red and black accents. On the wall opposite the counter and appliances is going to be a baking day hutch from my zibbet shop. The window is a bay and I plan to have a small dining area there.

It's a start

 I gave a warm, aged finish to the stark white plaster walls that the house came with. The living room is off to a good start on a French country feel. I am planning to make a sofa with black and cream toile and a chair in dark red gingham. The drapes will be toile as well..
 My husband got me some of the Hobby Lobby unfinished pieces for Christmas as well as some Michael's hutches. These will get put to use in this house. I found some stickers today at Hobby Lobby to use as carved effects on several of these pieces. You'll also notice that I gessoed over the wallpaper in this room. It wasn't going to come off and it wasn't what I envisioned so this was the best way to handle it.


This is after a primer coat on each piece. Stay tuned for finished pieces soon!